
A broken link. An incorrect merge tag. The wrong audience segment. A discount code that doesn’t work.
Small email mistakes can quickly turn into big problems once a campaign reaches thousands of subscribers. And unlike a web page, an email can’t simply be edited after it’s sent.
That’s why every email marketing team needs a consistent email quality assurance (QA) process.
An Email QA Checklist gives your team a repeatable process for reviewing campaign setup, content, links, personalization, design, rendering, accessibility, and other critical elements before approving an email for launch.
Whether you’re sending a newsletter to a few hundred subscribers or managing campaigns for a large marketing database, the objective is the same: catch problems before your subscribers do.
This Email QA Checklist provides a structured, seven-stage process your team can follow before every campaign.
EmailOps Framework™
Email quality assurance sits within the “Review phase“ of the EmailOps Framework™. It takes place after an email has been created and before it is approved for launch.
What Is Email QA?
Email QA, or email quality assurance, is the process of systematically reviewing and testing an email campaign before it is sent to subscribers.
A complete email QA process goes beyond proofreading the copy. It verifies that the campaign is accurate from both a marketing and technical perspective.
The goal isn’t simply to find mistakes. A good QA process creates a consistent standard that every campaign must meet before it can move from Review to Launch.
Four important areas of Email QA
- Proofreading: Checking copy, spelling, grammar, dates, offers, and other content.
- Email testing: Testing links, buttons, personalization, dynamic content, and other functional elements.
- Technical QA: Reviewing email rendering, mobile responsiveness, accessibility, tracking, and deliverability considerations.
- Final approval: Confirming that required stakeholders have reviewed and approved the campaign for launch.
Why Every Email Campaign Needs a QA Process
Even experienced email teams make mistakes.
Campaign deadlines get moved forward. Last-minute copy changes are requested. Links are replaced. Audience segments are updated. A stakeholder asks for one final change five minutes before the campaign is scheduled.
These situations create opportunities for errors.
Without a structured QA process, teams often rely on memory and informal checks. One person may focus on spelling, while another checks links but forgets personalization. Someone else assumes the audience was already verified.
EmailOps Tip: Treat QA as a standard stage of your email production workflow—not an optional task you perform only when there’s enough time.
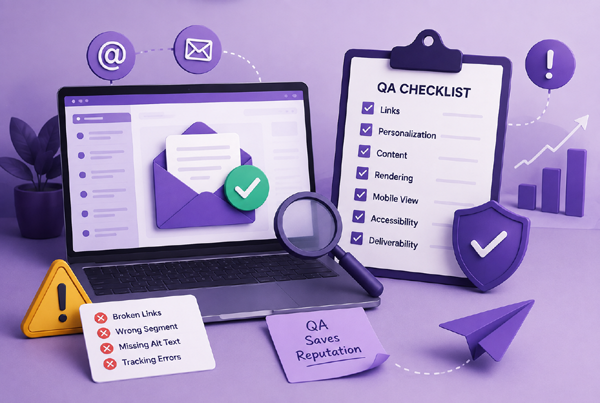
A repeatable email QA checklist helps reduce the risk of:
- Broken or incorrect links
- Incorrect personalization
- Emails being sent to the wrong audience
- Missing suppression or exclusion rules
- Mobile and email-client rendering problems
- Incorrect dates, prices, or promotional details
- Missing or inaccurate tracking parameters
- Accessibility issues
- Brand inconsistencies
- Unapproved campaigns being launched
The Complete Email QA Checklist
Use the following checklist as a starting point for your team’s email QA process. Depending on your Email Service Provider (ESP), campaign complexity, industry, and internal approval requirements, you may need to add additional checks.
#1. Campaign Setup & Audience
Before reviewing the email itself, verify that the basic campaign configuration is correct.
Campaign Setup
- Confirm the campaign name follows your team’s naming convention.
- Verify the sender or “From” name.
- Verify the sender email address.
- Check the reply-to email address.
- Confirm the subject line.
- Check the preview or preheader text.
- Confirm the scheduled send date.
- Confirm the scheduled send time.
- Verify the correct time zone is selected.
Audience
- Confirm the correct recipient list or audience segment.
- Verify segmentation rules.
- Check suppression lists.
- Check exclusion lists.
- Confirm that internal or test contacts are excluded where necessary.
- Review the estimated recipient count for unexpected changes.
Common Mistake: Teams sometimes focus so heavily on the email creative that they forget to perform a final audience check. A perfectly designed email sent to the wrong segment is still a failed campaign.
#2. Content & Copy Review
Next, review all written content for accuracy, clarity, and consistency.
- Proofread the headline.
- Proofread the body copy.
- Check spelling and grammar.
- Verify names, product names, and company names.
- Confirm dates and deadlines.
- Verify prices and promotional offers.
- Check discount codes.
- Review legal disclaimers where applicable.
- Confirm the content matches the approved campaign brief.
- Check brand voice and tone.
- Verify CTA copy.
- Confirm the subject line accurately reflects the email content.
- Check that the preview text complements the subject line.
Pay particular attention to content that can change late in the production process, such as prices, dates, promotional terms, event details, and discount codes.
EmailOps Tip: Whenever possible, have someone other than the person who wrote or built the campaign perform the final copy review. A fresh pair of eyes is more likely to notice errors that the original creator has become accustomed to seeing.

#3. Links & CTA Testing
Every clickable element should be tested before launch.
Links
- Test all text links.
- Test CTA buttons.
- Test linked images.
- Check logo links.
- Verify social media links.
- Check footer links.
- Verify the unsubscribe link.
- Check preference center links, if applicable.
Destinations
- Confirm each link opens the intended landing page.
- Check for broken links.
- Check for placeholder URLs.
- Check for staging or development URLs.
- Verify that landing pages are live.
- Test important landing pages on mobile.
Tracking
- Verify UTM parameters.
- Confirm campaign naming within tracking parameters.
- Check that tracked URLs still lead to the correct destination.
- Verify any additional click-tracking configuration.
Common Mistake: Don’t only check whether a URL works. Verify that the final tracked URL takes subscribers to the correct destination. Tracking parameters and redirects can sometimes introduce problems that weren’t present in the original URL.
#4. Personalization & Dynamic Content
Personalization can make emails more relevant, but it also introduces additional opportunities for errors.
- Test all merge tags.
- Verify personalization fields.
- Check fallback values.
- Test dynamic content blocks.
- Verify conditional content rules.
- Confirm segmentation logic.
- Test multiple subscriber profiles where possible.
- Check personalization in the subject line, if used.
- Verify personalized URLs or offers.
- Don’t test only the ideal scenario.
For example, if your email begins with:
Hi {{FirstName}},
you also need to know what happens when the subscriber’s first name is not available.
Does the email display:
Hi
Or does your fallback correctly display something like:
Hi there,
Test both scenarios before approving the campaign.
EmailOps Tip: For campaigns with complex personalization or dynamic content, maintain dedicated test contacts representing different subscriber scenarios. This makes it easier to verify what different audience segments will actually receive.
#5. Design, Rendering & Mobile Testing
An email that looks perfect in your email builder may not look the same when it reaches a subscriber’s inbox.
Email clients can interpret HTML and CSS differently, so rendering should be part of your QA process.
Design
- Verify logo placement.
- Check brand colors.
- Review fonts and typography.
- Check spacing and alignment.
- Verify image dimensions.
- Check image quality.
- Confirm CTA buttons are visually consistent.
Mobile
- Review the email on desktop.
- Review the email on mobile.
- Check font sizes on smaller screens.
- Verify buttons are easy to tap.
- Check image scaling.
- Review content stacking.
- Check for horizontal scrolling.
Email Client Rendering
Where appropriate, test the campaign across the email clients most relevant to your audience, which may include:
- Gmail
- Outlook
- Apple Mail
- Yahoo Mail
- Mobile email applications
Specialized email testing platforms can help teams preview campaigns across multiple email clients and devices.
Additional Rendering Checks
- Review dark mode appearance.
- Test the email with images disabled.
- Verify alt text.
- Check background images where used.
- Review animated GIF fallbacks where applicable.
You don’t necessarily need to test every email client in existence. Focus your testing strategy on the clients and devices your subscribers actually use, while paying additional attention to campaigns with complex designs.
#6. Accessibility & Deliverability Checks
Your QA process should also consider whether subscribers can access and receive the email effectively.
Accessibility
- Add meaningful alt text to important images.
- Check text and background contrast.
- Use a logical heading hierarchy.
- Use descriptive link and CTA text.
- Avoid relying solely on images to communicate important information.
- Check that important content remains understandable when images are disabled.
Deliverability
- Review spam testing results where applicable.
- Check for obvious spam-triggering issues.
- Verify the email isn’t unnecessarily large.
- Check image sizes and load times.
- Confirm the unsubscribe mechanism works correctly.
- Review any deliverability warnings generated by your ESP or testing platform.
Your broader email infrastructure should also be configured correctly, including authentication mechanisms such as SPF, DKIM, and DMARC.
These infrastructure settings don’t normally need to be manually verified before every campaign. However, they should be monitored and periodically reviewed as part of your overall email operations and deliverability process.
#7. Final Approval & Launch Readiness
Once the campaign has passed the previous QA stages, perform the final approval check.
- Send a final test email.
- Complete internal QA.
- Confirm all requested revisions have been implemented.
- Re-test any elements changed during the review process.
- Obtain required stakeholder approvals.
- Document approval where necessary.
- Confirm the campaign is marked as approved.
- Perform the final pre-send check.
- Approve the campaign for launch.
The EmailOps Re-Check Rule
Any change made after final QA should trigger another check of the affected elements before the campaign is launched.
For example, if someone requests a CTA change after QA, don’t simply change the CTA text and assume the campaign is ready.
- Update the CTA.
- Check the copy.
- Test the button.
- Verify the destination URL.
- Then approve the change.
This simple discipline can prevent many last-minute campaign errors.
Recommended Email QA Workflow
A checklist tells you what to check.
A QA workflow tells your team when and in what order to check it.
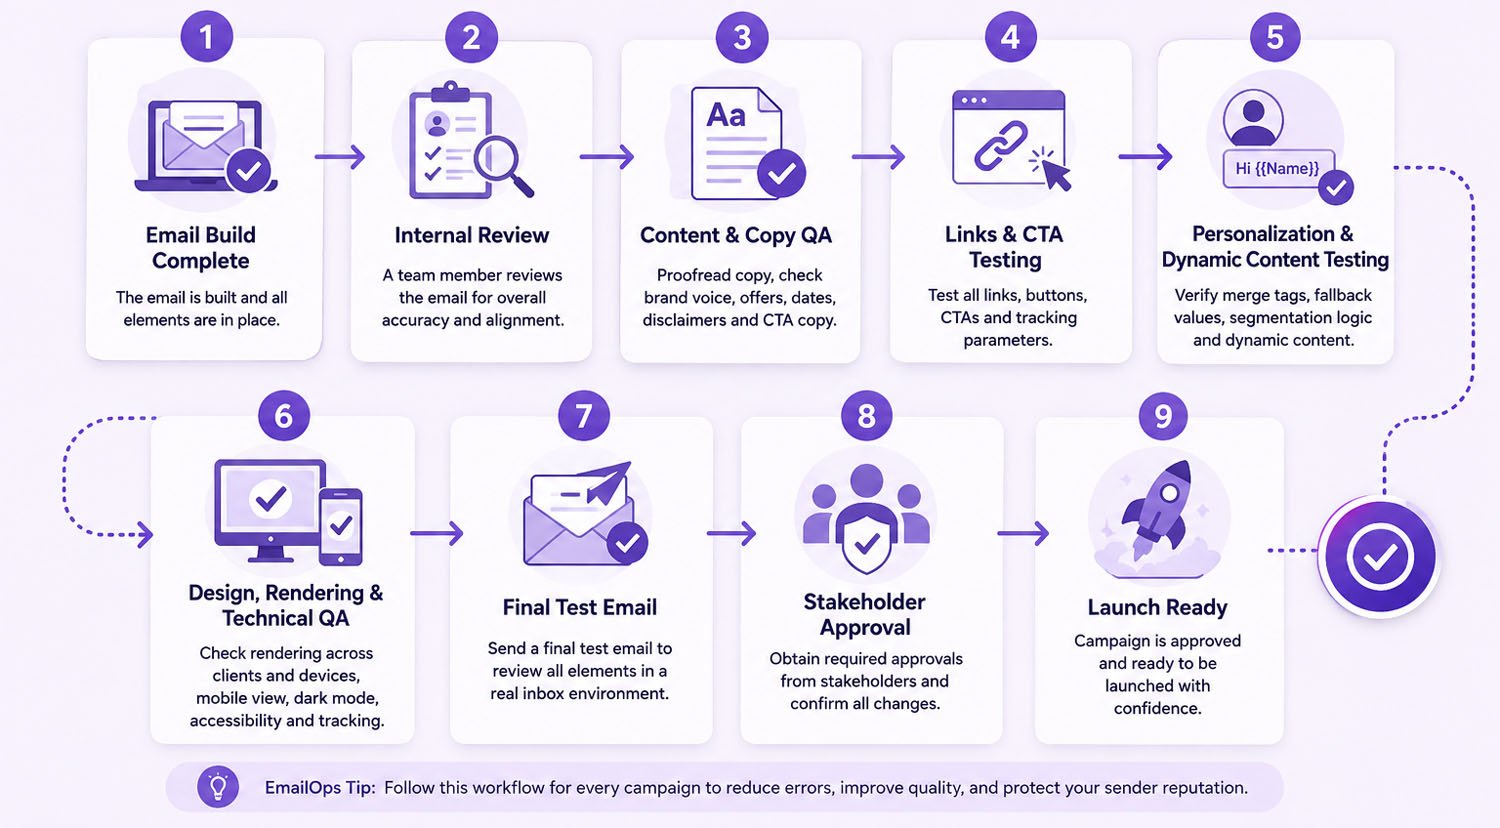
A practical email QA workflow might look like this:
-
Email Build Complete
The email is built and all elements are in place.
-
Internal Review
A team member reviews the email for overall accuracy and alignment.
-
Content & Copy QA
Proofread copy, check brand voice, dates, disclaimers and CTA copy.
-
Links & CTA Testing
Test all links, buttons, CTAs and tracking parameters.
-
Personalization & Dynamic Content Testing
Verify merge tags, fallback values, segmentation logic and dynamic content.
-
Design, Rendering & Technical QA
Check rendering across clients and devices, mobile view, dark mode, accessibility and tracking.
-
Final Test Email
Send a final test email to review all elements in a real inbox environment.
-
Stakeholder Approval
Obtain required approvals from stakeholders and confirm all changes.
-
Launch Ready
Campaign is approved and ready to be launched with confidence.
EmailOps Tip: Follow this workflow for every campaign to reduce errors, improve quality, and protect your sender reputation.
Your exact workflow may vary depending on team size and campaign complexity, but the objective should be the same: establish a predictable path from completed email build to approved campaign.
Who Should Perform Email QA?
The answer depends on the size and structure of your email marketing team.
Small Teams
In a small marketing team, the person building the campaign may perform the initial QA, followed by a second team member who conducts the final review.
A simple workflow could be:
- Campaign Builder
- Second Reviewer
- Campaign Approval
Larger Teams
Organizations with dedicated email marketing or operations teams may divide responsibilities across multiple roles.
For example:
- Email Specialist
- QA Specialist
- Email Marketing Manager
- Stakeholder Approval
For more complex campaigns, designers, copywriters, CRM specialists, legal teams, or compliance teams may also participate in the review process.
Regardless of team size, one principle is useful:
“Whenever possible, the person conducting the final QA should not be the only person who created and built the campaign.”
Independent review reduces the likelihood of overlooking familiar mistakes.
Common Email QA Mistakes
Even teams with established QA processes can run into problems. Here are some of the most common mistakes to avoid.
Rushing QA Because of Deadlines
When campaigns fall behind schedule, QA is often the first stage teams try to shorten. Instead, build enough review time into the campaign timeline so QA isn’t treated as an obstacle to launch.
Testing Only on Desktop
A campaign that looks good on a large screen may be difficult to read or interact with on mobile. Always include mobile testing in your standard process.
Testing Only the Ideal Personalization Scenario
Personalization should be tested with complete, incomplete, and unexpected subscriber data where appropriate.
Fallback values are just as important as the personalization itself.
Forgetting Tracking Parameters
A campaign may perform well but still produce incomplete reporting if tracking wasn’t configured correctly. Include UTM and analytics validation in your QA process.
Making Last-Minute Changes Without Re-Testing
A “small” change can create a new error. Apply the EmailOps Re-Check Rule whenever changes are made after QA.
Relying Entirely on Automated Testing
Automated tools can identify many technical issues, but they can’t always determine whether a message makes sense, an offer is correct, or a campaign aligns with its brief. Combine automated testing with human review.
Failing to Document Approval
For teams with multiple stakeholders, unclear approvals can create confusion about whether a campaign is actually ready to launch. Establish a clear approval process and document the final decision.
Frequently Asked Questions About Email QA
What is an email QA checklist?
An email QA checklist is a structured list of checks performed before an email campaign is sent. It typically covers campaign setup, audience selection, content, links, personalization, rendering, accessibility, tracking, and final approval.
What should you check before sending a marketing email?
At minimum, check the audience, sender information, subject line, preview text, copy, links, CTAs, personalization, tracking, mobile appearance, and final approval status. More complex campaigns may require additional rendering, accessibility, dynamic content, and deliverability testing.
Who should perform email QA?
The campaign builder can perform an initial review, but whenever possible, a second person should conduct the final QA. Larger teams may have dedicated email operations or QA specialists responsible for this process.
How long should email QA take?
There is no universal timeframe. A simple newsletter may require a relatively quick review, while a complex campaign involving multiple segments, dynamic content, personalization, and custom designs may require significantly more testing. QA time should be based on campaign complexity and risk rather than an arbitrary deadline.
Do I need an email testing tool?
Not every team needs a dedicated email testing platform, but specialized tools can be valuable when you need to test rendering across multiple email clients and devices. Your ESP may also provide built-in preview and testing capabilities.
Should every email campaign go through QA?
Yes. The depth of QA may vary depending on the campaign’s complexity and risk, but every marketing email should go through a consistent review process before launch.
Make Email QA a Repeatable Process
Good email QA isn’t about catching mistakes at the last minute.
It’s about creating a repeatable process that prevents mistakes from reaching subscribers in the first place.
A structured Email QA Checklist gives your team a consistent standard for reviewing campaigns, reduces reliance on memory, and makes it easier to maintain quality as campaign volume grows.
Within the EmailOps Framework™, email quality assurance is part of the Review phase, the point where your team validates that the campaign created during the Create phase is genuinely ready to move into Launch.
The more consistent your QA process becomes, the more confidently your team can hit Send.